If y'all are planning to perform regression testing of whatever software spider web application using webdriver software testing then manifestly in that location volition hold out multiple testify cases or testify classes nether your webdriver project. Example - There are ii junit testify cases of software spider web application nether your project's package. Now if y'all wants to run both of them together with then how volition y'all utilisation it? Simple together with tardily solution is creating JUnit testify suite. If your projection has to a greater extent than than ii testify cases of software spider web application then y'all tin create testify suite for all those testify cases to run all testify cases from i place.
Before creating junit testify suite, y'all must convey to read my post service well-nigh "How to download together with install junit inward eclipse" together with "How to utilisation together with run junit testify inward eclipse". Now permit me pull y'all how to utilisation junit testify suite inward eclipse for your junit testify instance of software spider web application.
Step 1 - Create novel projection together with package
Create novel projection inward eclipse amongst cite = junitproject together with and then add together novel packet = junitpack nether your project. VIEW THIS POST to know how to utilisation novel projection together with add together packet inward eclipse. Add required external jolt files for selenium webdriver.
Step ii - Create 1st Test Case
Now utilisation JUnit testify instance under junitpack packet amongst bird cite = junittest1 every bit bellow. VIEW THIS post to know how to utilisation junit testify instance inward eclipse.
package junitpack; import org.junit.Test; import org.openqa.selenium.By; import org.openqa.selenium.WebDriver; import org.openqa.selenium.firefox.FirefoxDriver; world bird junittest1 { WebDriver driver = novel FirefoxDriver(); @Test world void test() throws InterruptedException { driver.manage().window().maximize(); driver.get(" "); driver.findElement(By.xpath("//input[@name='fname']")).sendKeys("junittest1 executed"); Thread.sleep(2000); System.out.print("junittest1 bird is executed"); driver.quit(); } }Step three - Create 2d testify case
Same way, Create 2d testify bird amongst cite = junittest2 nether packet = junitpack every bit bellow.
package junitpack; import org.junit.After; import org.junit.Before; import org.junit.Test; import org.junit.Ignore; import org.openqa.selenium.By; import org.openqa.selenium.WebDriver; import org.openqa.selenium.firefox.FirefoxDriver; world bird junittest2 { WebDriver driver = novel FirefoxDriver(); @Before world void setup () { driver.manage().window().maximize(); driver.get(" "); } @After world void aftertest() { driver.quit(); }@Test world void test1() throws InterruptedException{ driver.findElement(By.xpath("//input[@name='fname']")).sendKeys("junittest2 class-test1"); System.out.print("\njunittest2 class-test1 method is executed"); Thread.sleep(2000); }@Test world void test2() throws InterruptedException { driver.findElement(By.xpath("//input[@name='fname']")).sendKeys("junittest2 class-test2"); Thread.sleep(2000); System.out.print("\njunittest2 class-test2 method is executed"); } }
Step iv - Create testify suite for both testify cases
Now nosotros convey ii testify cases(junittest1.java together with junittest2.java) nether packet = junitpack.
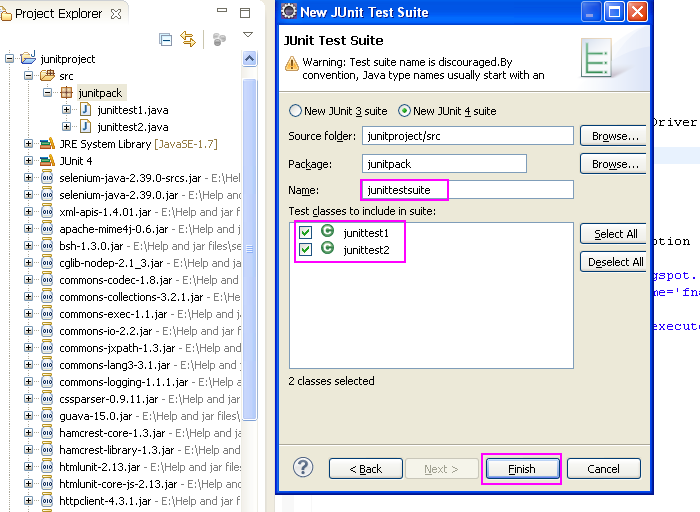
To utilisation testify suite, Right click on junitpack package folder together with Go to -> New -> Other -> Java -> Junit -> Select 'JUnit Test Suite' every bit shown inward bellow image.

Now click on Next button.On adjacent screen, add together junit testify suite cite = junittestsuite together with direct both testify cases every bit shown bellow picture together with and then click on Finish button.
It volition add together novel testify suite bird = junittestsuite.java nether your packet every bit bellow.
package junitpack; import org.junit.runner.RunWith; import org.junit.runners.Suite; import org.junit.runners.Suite.SuiteClasses; @RunWith(Suite.class) @SuiteClasses({ junittest1.class, junittest2.class }) world bird junittestsuite { }If y'all run across inward higher upward suite class, in that location are ii junit annotations added amongst cite = @RunWith and @SuiteClasses. @RunWith notation volition references junit to run testify inward bird together with @SuiteClasses describes classes included inward that testify suite.
Video on how to utilisation JUnit testify suite for selenium webdriver
Now your junit testify suite is created together with projection construction volition looks similar bellow.

Step iv - Running testify suite
Select junit testify suite bird = junittestsuite together with run it inward eclipse. When y'all run junit testify suite, eclipse volition run both testify cases (junittest1 together with junittest2) i yesteryear one. When execution completed, y'all volition run across bellow given output lines inward console.
junittest1 bird is executed
junittest2 class-test1 method is executed
junittest2 class-test2 method is executed
junittest2 class-test1 method is executed
junittest2 class-test2 method is executed
junit testify execution study volition looks similar bellow.

This agency nosotros tin utilisation junit testify suite to run multiple testify cases from i place. You tin sentiment all Junit tutorial posts for webdriver on THIS LINK.
VIEW MY NEXT POST to know how to ignore testify from execution.
VIEW MY NEXT POST to know how to ignore testify from execution.
Thank you so much for uploading testing tutorial blog. clearly understand your way of explaining of blog. Please keep upload.
ReplyDelete